Archive for the ‘Tutorial’ Category

[Tutorial] jnativehook : Control native mouse and keyboard calls outside Java

Wednesday, November 29th, 2017

In programming a “hook” is a way for a programmer to access already existing code and modify it to his specification. A mouse hook in java is quite similar to a MouseListener, except while a MouseListener functions only within the swing or awt component it is bound to, a native mouse hook can intercept mouse calls from all over the system. This makes it immensely useful for various kinds of programs. Here, I’ll try to explain how the jnativehook library can be used to detect mouse and keyboard calls.

jnativehook is an opensource native hook library for Java. It functions as a Global Mouse and Keyboard Listener.

jnativehook can be downloaded from its official GitHub page here :
https://github.com/kwhat/jnativehook/releases
Extract and add jnativehook to your build path.

Mouse Hook :
To use a Mouse Hook in your program, have your class implement NativeMouseInputListener.
Methods to override :
public void nativeMouseClicked(NativeKeyEvent e);
public void nativeMousePressed(NativeKeyEvent e);
public void nativeMouseReleased(NativeKeyEvent e);
public void nativeMouseMoved(NativeKeyEvent e);
public void nativeMouseDragged(NativeKeyEvent e);

These methods are self explanatory. Put the code you want to run when your mouse is clicked, pressed, released, moved or dragged in these methods.

To register jnativehook and cause it to start listening to mouse events globally, enclose this line in a try catch block :
GlobalScreen.registerNativeHook();

To unregister it :
GlobalScreen.unregisterNativeHook();

For a program which detects and outputs which mouse actions have been performed :

import org.jnativehook.GlobalScreen;
import org.jnativehook.NativeHookException;
import org.jnativehook.mouse.NativeMouseEvent;
import org.jnativehook.mouse.NativeMouseInputListener;

public class GlobalMouseListenerExample implements NativeMouseInputListener {
public void nativeMouseClicked(NativeMouseEvent e) {
System.out.println("Mouse Clicked: " + e.getClickCount());
}

public void nativeMousePressed(NativeMouseEvent e) {
System.out.println("Mouse Pressed: " + e.getButton());
}

public void nativeMouseReleased(NativeMouseEvent e) {
System.out.println("Mouse Released: " + e.getButton());
}

public void nativeMouseMoved(NativeMouseEvent e) {
System.out.println("Mouse Moved: " + e.getX() + ", " + e.getY());
}

public void nativeMouseDragged(NativeMouseEvent e) {
System.out.println("Mouse Dragged: " + e.getX() + ", " + e.getY());
}

public static void main(String[] args) {
try {
GlobalScreen.registerNativeHook();
}
catch (NativeHookException ex) {
System.err.println("There was a problem registering the native hook.");
System.err.println(ex.getMessage());

System.exit(1);
}

// Construct the example object.
GlobalMouseListenerExample example = new GlobalMouseListenerExample();

// Add the appropriate listeners.
GlobalScreen.addNativeMouseListener(example);
GlobalScreen.addNativeMouseMotionListener(example);
}
}

Similarly for a Keyboard Hook have your class implement NativeKeyListener.
Methods to override :

public void nativeKeyPressed(NativeKeyEvent e)
public void nativeKeyReleased(NativeKeyEvent e)
public void nativeKeyTyped(NativeKeyEvent e)

The method NativeKeyEvent.getKeyText(e.getKeyCode()) will return the key that was pressed. Where e is the NativeKeyEvent accepted by each of the overriden methods.


import org.jnativehook.GlobalScreen;
import org.jnativehook.NativeHookException;
import org.jnativehook.keyboard.NativeKeyEvent;
import org.jnativehook.keyboard.NativeKeyListener;

public class GlobalKeyListenerExample implements NativeKeyListener {
public void nativeKeyPressed(NativeKeyEvent e) {
System.out.println("Key Pressed: " + NativeKeyEvent.getKeyText(e.getKeyCode()));

if (e.getKeyCode() == NativeKeyEvent.VC_ESCAPE) {
GlobalScreen.unregisterNativeHook();
}
}

public void nativeKeyReleased(NativeKeyEvent e) {
System.out.println("Key Released: " + NativeKeyEvent.getKeyText(e.getKeyCode()));
}

public void nativeKeyTyped(NativeKeyEvent e) {
System.out.println("Key Typed: " + e.getKeyText(e.getKeyCode()));
}

public static void main(String[] args) {
try {
GlobalScreen.registerNativeHook();
}
catch (NativeHookException ex) {
System.err.println("There was a problem registering the native hook.");
System.err.println(ex.getMessage());

System.exit(1);
}

GlobalScreen.addNativeKeyListener(new GlobalKeyListenerExample());
}
}

Overriding the nativeKeyPressed() method like above will output the KeyText of every button pressed. It will also unregister the nativehook if the “ESC” key is pressed.

OpenCV Experiment : Virtual On Screen Drums

Monday, June 12th, 2017

I was recently involved in a lot of Image Processing for a project at college and while I’m no longer interested in what I was working on, I still wanted to do something fun with whatever OpenCV and Image Processing Techniques I had learnt.

I imagined an “On Screen Drums Application” where we use a live video input to detect a “drumstick” we hold up and use to beat on a virtual drum causing it to reverberate depending on how hard we hit it.

Its not too complex and can quite easily be done with some simple OpenCV tricks in Java.

First we receive the video stream and process it frame by frame. We filter each frame for the specific color and shape of the marker on our “drumstick”. In my case, my drumstick is a bright orange ball stuck to a pencil. Once we’ve identified where the marker is, we compare its current position with its position in the previous frame to roughly calculate how fast it’s traveling.

We overlay an image of a drum on the video feed and when the marker touches the overlay, we use Java’s inbuilt MIDI synthesizers to generate drum noises depending on the speed at which the drum overlay was struck.

Identifying the marker :
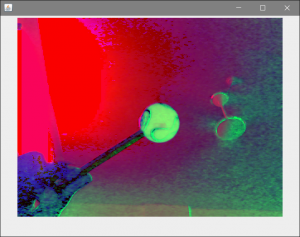
We first convert the frame to HSV as that color palette is much easier to compute with, rather than RGB.

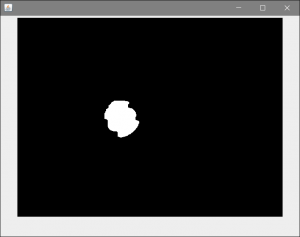
To identify the marker on the drumstick, start by filtering out its hsv value. A hsv range of (100, 100, 100) to (112, 255, 255) generally captures my marker alone and leaves out most other things.  Anything outside that threshold gets filtered out and that leaves us with just the marker. We run a couple of erode and dilate methods through the filtered image and that leaves us with a blob which is our marker in the frame. We also know the general size of the ball so getting the third moment of the blob would give its size. Checking if the moment is always larger than a fixed number would further eliminate mistakes.

Drawing the Drum overlay:
We use Java’s Graphics class to draw a drum overlay on the video feed. The overlay is an image of a drum cropped down to size and the rest of the screen filled with transparency. It’s saved in png format to preserve transparency.

Generating Drum Beats:
We initialize Java’s MIDI synthesizers and select the channel which sounds best. I liked channel 114 and that’s what I’ve used. I honestly can’t tell the difference between most channels, so it makes no difference to me. We check if the position of the marker intersects with the overlay on screen and if its velocity is greater than a suitable threshold. If so, then we tell Java to bang its virtual drums as hard as we virtually hit it.

The whole project is on my GitHub page at
https://github.com/Vetox/Virtual-On-Screen-Drum

Here are a few screenshots :
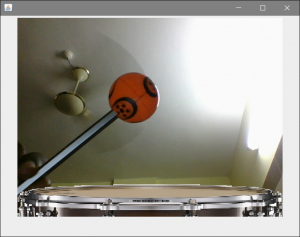
The marker on screen with the overlay

The same frame’s HSV image:

The same frame after filtering:

SPOJ Classical Problem FARIDA Dynamic Programming Tutorial

Friday, December 16th, 2016


This will be an editorial of the FARIDA problem from SPOJ which is an basic dynamic programming problem. It is easily solved by knowing the initial states and the simple transition from previous states to the next ones.

This problem is from : http://www.spoj.com/problems/FARIDA/

Problem Statement:

Once upon time there was a cute princess called Farida living in a castle with her father, mother and uncle. On the way to the castle there lived many monsters. Each one of them had some gold coins. Although they are monsters they will not hurt. Instead they will give you the gold coins, but if and only if you didn’t take any coins from the monster directly before the current one. To marry princess Farida you have to pass all the monsters and collect as many coins as possible. Given the number of gold coins each monster has, calculate the maximum number of coins you can collect on your way to the castle.

This is the problem faced by FARIDA, a cute princess, many of you would have come across early in your adventure across dynamic programming kingdom. With an acceptance percentage of around 29%. This would be one of the easiest DP problems, but can lay the foundations to better understanding of DP states and their transition.

So, the problem basically reduces to :

Given an array, output the maximum sum of elements you can make from a subset of the array such that no two consecutive numbers from the original array are included in the subset.

Now, considering a DP[i] to be the maximum sum obtainable under such conditions till ‘i’ in the array. The DP transitions are intuitively derived as:
DP[i] = Maximum of ( DP[i – 1] ) &  ( DP[i] + element ‘i’ from the array )

If we decide not to include element ‘i’ the maximum obtainable sum up to ‘i’ will be DP[i – 1]. If we decide to include DP[i] then the maximum will be DP[i – 2] + Element ‘i’, since we cant include element ‘i – 1’ in this.
So you can see how the maximum of these two values will give us the general DP recurrence. Then, the initial states easily work out to be
DP[0] = First element in array
DP[1] = Maximum of first and second elements in array.

Lastly including condition for n = 0, and n = 1, the problem is solved.

This should easily bring you an AC and 0.02 points on SPOJ as of writing the article.

The problem BadNeighbours from Top Coder is also very similar to this one.

Here is the Java code to clear things up for you:

import java.util.Scanner;

class FARIDA {
public static void main(String[] args) throws Exception {
Scanner sc = new Scanner(System.in);
int n = sc.nextInt();
for (int i = 0; i < n; i++) {
int t = sc.nextInt();
int[] a = new int[t];
for (int j = 0; j < t; j++) {

a[j] = sc.nextInt();

}

long[] dp = new long[t];

if (t == 0) {

System.out.println("Case " + (i + 1) + ": 0");

continue;

}

if (t >= 1) {
dp[0] = a[0];
}
if (t >= 2) {
dp[1] = a[0] > a[1] ? a[0] : a[1];
}
if (t >= 3) {
for (int j = 2; j < t; j++) {
dp[j] = Math.max(dp[j - 1], dp[j - 2] + a[j]);
}
}
System.out.println("Case " + (i + 1) + ": " + dp[dp.length - 1]);
}
}
}

[Tutorial] Scatter Effect in Photoshop

Tuesday, December 22nd, 2015

In this tutorial I will be teaching you how to make a basic scatter effect in PhotoShop. We will be creating our own brush to scatter the image in various directions.

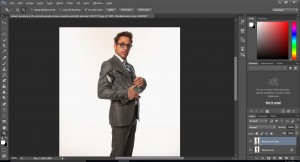
I will be using this image of Robert Downey Jr to demonstrate this effect.

robert-downey-jr-th-annual-people-choice-awards-portraits-january-52831773


Creating the Scatter Brush:

First, create a new canvas with the dimensions of 10 x 10 pixels. Fill it with Black and click on Edit > Define Brush Preset. Name it whatever you want and click Save. This is the brush we will be using.

Setting up the Subject

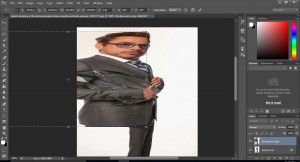
Now, back to RDJ. Flip the image so that he faces the opposite direction and copy the whole layer. Then create a new layer and paste the contents which you just copied.

3

In the new layer, Select parts of him that you want to scatter and transform it to cover the whole of the image. Ctrl + T is the shortcut to Transform your selection.

3

Add a layer mask to this layer and fill it with black. The whole layer should be invisible now. Select the brush tool and go to the new brush preset which we created. (Right click with the brush tool to look at a list of brush presets)
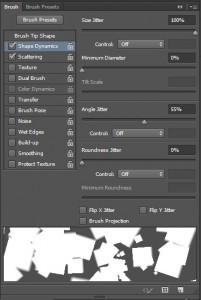
Go to Brush Options and enable Shape Dynamics and Scattering. Play around with the setting until you are satisfied.

3

Scattering the Subject:

Now change the Foreground Color to White and paint the places where you want to scatter the image.
Erase the places where you’ve gone wrong with a normal brush and Black Foreground color.

3

And the finished product:

Add a layer mask to the original layer as well and with the Foreground Color as Black paint a little inside the subject to give the illusion of the particles having been broken off of the subject.

3